Intro
Data is the backbone of all the reports and analyses. The ability to export data from your reports gives you the freedom to use it elsewhere. For example, you may want to use the data for further calculations or use it as a source in some other reports. For all such purposes, ancoreShare Extension allows you to export data from multiple Sense tables objects to Excel and CSV files.
You have the option to put the data export of multiple table elements on separate sheets within one Excel file or assign certain elements to different Excel files.
When choosing to export the table data to CSV, each element will be exported to a separate CSV file, but all the files will be generated at once (your browser might ask you to allow the download of multiple files).
Further you can choose file names, sheet names, and delimiters as you need.
If your report contains other elements (like text or chart elements), they will not be processed in the data export part of report generation. However you have the option to execute the data export additionally to your regular PDF or PowerPoint export.
Learn more about that in the next section.
Enabling data export
The data export can be applied to all table elements in your report and it can be executed additionally to a PDF or a PowerPoint export.
Basically there are three places where the data export settings can be specified:
The following sections explain the specifics and relations of those settings.
Make sure to also read the Data Export section in Export Settings to further learn about centrally setting a filename for data exports or specify the delimiter of CSV exports.
Choose elementsThe basic enablement of the data export happens within each table element you choose for your report. Whether you create a report just for data export purposes or you'd like to extract some data from certain elements of a PDF report, first you go to the properties of the respective table and enable this feature:
Repeat this for all table elements of your report whose data should be exported by this feature. File Type | 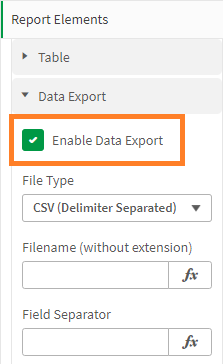 |
You can choose between Excel and CSV as an output format for your data exports. XLSX (Excel) is a rich format and allows to add multiple tables to a singe file, putting each element on a separate Excel sheet. Whereas CSV (Delimiter Separated) always creates a separate file for each table element, but all of them are generated at once (your browser might ask you to allow the download of multiple files). Filename (Element) |  |
By default all data export files are named after the Qlik Sense object ID of the respective table element. This also means that by default each table element is exported in a separate Excel or CSV file, named after its ID. Only set the custom name for the file here without the file extension (i.e. ".xlsx" or ".csv"), it will then be applied to both Excel and CSV exports. In order to put multiple table elements in a single Excel sheet, set the same filename for each. Table elements with the same filename property will be collectively exported in one Excel file. There is also the option to set a filename for the data export globally for the whole report in Export Settings. You can then choose to exclude certain table elements from this setting by giving a different filename here in its element properties. Pool tables in one file Table elements assigned to the same filename will be put in the same Excel file. | 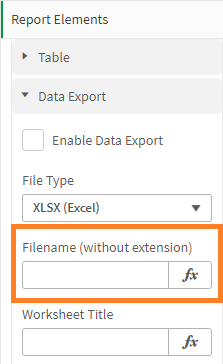 |
Worksheet TitleThis setting only applies to Excel exports, as CSV files don't have sheets and only appears if the File Type is set to XLSX. Set a title for the Excel worksheet where this table element will be put on. Use Qlik Expressions for dynamic Worksheet titles or a Qlik Field if you cycle an element. Make sure your Worksheet title does not contain any forbidden characters and does not exceed the max. character limit of 30 (Excel default). |  |
File FormatThis setting applies to CSV exports and only appears if the File Type is set to CSV. BOM (Byte Order Mark) is an invisible character used to indicate the encoding of a text file or stream. When a file is encoded in UTF-8 with BOM, the BOM character is placed at the beginning of the file to indicate that the file is encoded in UTF-8. This allows text editors and web browsers to correctly interpret the file as UTF-8, and display the characters correctly. This might for example be important if your CSV export is opened in Excel (which is also an editor), to make sure all potential symbols and characters are interpreted correctly. | 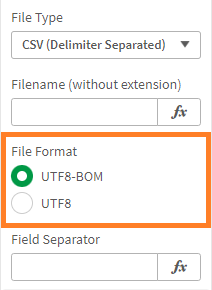 |
Field SeparatorThis setting applies to CSV exports and only appears if the File Type is set to CSV. You can choose and set a custom delimiter for your CSV data exports. It is a character which separates the columns in each data row. If you want to separate your data by a tabulator, just enter the word "tab" in this field. In cases where the set delimiter is also part of the field value in your data export, this data entry will automatically be put in quotes, for example: North Area, "10,000" (the delimiter is set to comma "," but is also part of the field value "10,000") There is also the option to set a CSV Field Separator globally for the whole report in Export Settings. You can then choose to exclude certain table elements from this global setting by setting a different delimiter here in its element properties. |  |
Data exports only | |
When choosing the Export Type PDF or PPTX, the data export is being generated additionally to that, but you can also choose to only export the data from all table elements of your report where this feature is enabled by choosing the option Data export only.
|  |
Enable Download | |
This feature is enabled by default and only refers to the download of the generated data export files in your browser. When user clicks on the ancoreShare button and If this feature is disabled, the data export is still getting generated (stored in your browser session cache) and can be exported otherwise, for example via custom JavaScript API.
Disable Data Export If you want to disable the data export completely, go to the settings of your Table Element, as this feature only refers to the download of the generated data export file. Filename (globally) |  |
By default all data export files are named after the Qlik Sense object ID of the respective table element. This also means that by default each table element is exported in a separate Excel or CSV file, named after its ID. The filename you set here will be applied globally to this report and when choosing the export file type XLSX all table elements will be put in one Excel file. However, when the export type is set to CSV, each table element will create a separate CSV file regardless of the filename. Pool tables in one file If you want to put all table elements in a single Excel file, make sure no filename is set within element properties and choose the file type XLSX. Only set the custom name for the file here without the file extension (i.e. ".xlsx" or ".csv"), it will then be applied to both Excel and CSV exports. CSV Field Separator | 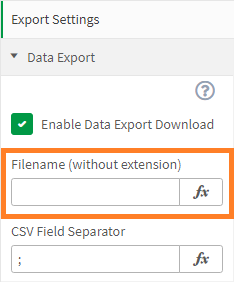 |
Set a global delimiter for CSV data exports (default is a semicolon ";"), it will then be applied to all table elements of this report, where the data export is enabled. The delimiter it is a character which separates the columns in each data row. If you want to separate your data by a tabulator, just enter the word "tab" in this field. In cases where the set delimiter is also part of the field value in your data export, this data entry will automatically be put in quotes, for example: North Area, "10,000" (the delimiter is set to comma "," but is also part of the field value "10,000") Global Setting If you want to have the same delimiter in all CSV exports within this report, make sure there is none set within each Table Element. | 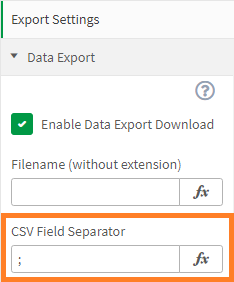 |
Next Steps:
- You can now download your report
- or share it to Dropbox
- or through a custom JavaScript API