Intro
Installing ancoreShare Server is pretty quick and straightforward. You can install and start exploring the powerful features in no time, without any additional configuration or supporting software.
To begin with, download the latest version of ancoreShare Server:
Click here to get your installation zip file.
You can also watch this video and let Christian show you how it's done in less than 4 minutes:
youtu.be/BVNOspkPbII?si=-GDjFuqcpjQ_KHJy
Basic installation
To install ancoreShare Server on a computer, perform the following steps.
- Right-click the downloaded installation folder, and unzip to extract installation resources. (There is no special location required.)
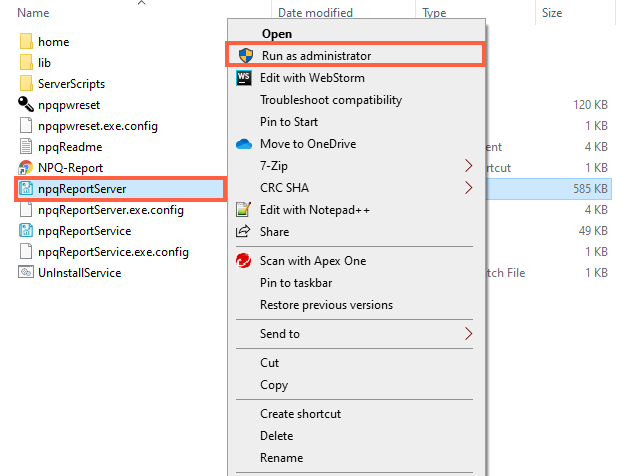
- Right-click the npqReportServer.exe* file and select the Run as administrator option to execute it.
ancoreShare Server starts running and shows the ancoreShare icon in the system tray on the Taskbar.
*(Although we re-branded the product name to ancoreShare, we chose to stay downwards compatible in respect of our long-time users, hence the installation will continue to run on "npqReportServer".)
Accessing ancoreShare Server portal
Inbound Client Access
To access the client interface in the same network as your installation is located, just click the internet shortcut in your installation directory, or navigate to "http://localhost:41000/" from a web browser.
Use the default credentials:
- Username: admin
- Password: admin
If port 41000 is already in use in your system, you can easily change it to any other port in the npqReportServer.exe.config* file.
Accessing Server from other network devices
To access the ancoreShare Server from other network devices, you just have to add the ports in your Firewall Inbound Rules.
The default ports are 41000 for HTTP and 41001 for HTTPS. You can change the ports in the npqReportServer.exe.config* file.
Then access your ancoreShare Server with the URL "http://YourServer:41000/"
*(Although we re-branded the product name to ancoreShare, we chose to stay downwards compatible in respect of our long-time users, hence the installation will continue to run on "npqReportServer".)
Licensing
To use the full functionality of your ancoreShare Server instance, you need to get a license key and store it in the settings.
Get licenseTo get a license, perform the following steps.
| 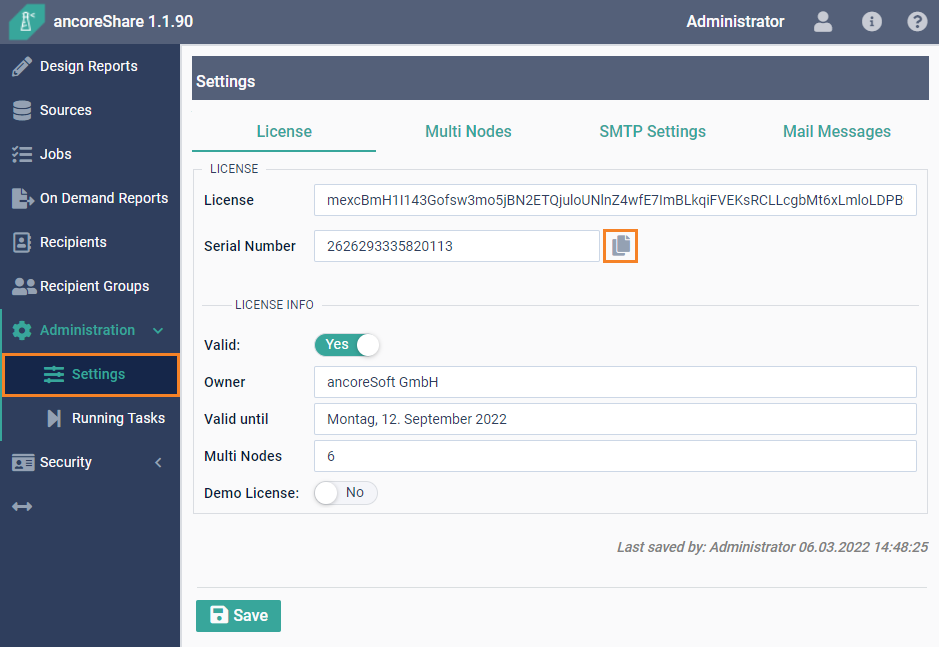 |
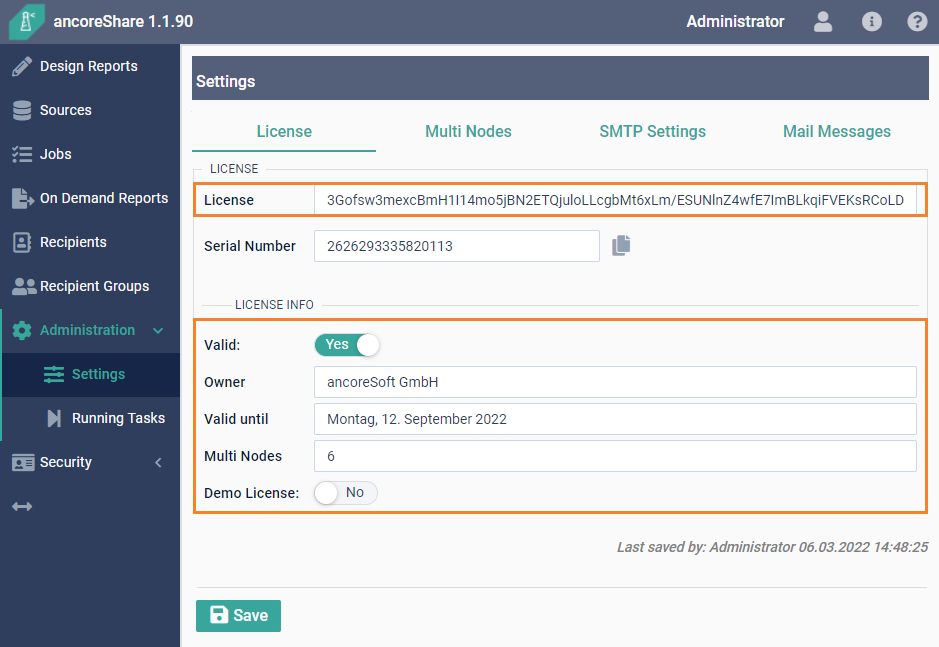
Store license keyOnce you have received your license file, perform the following steps.
|  |
Advanced configuration
This section helps with further configurations, mainly to assist you in installing and starting ancoreShare Server as a service.
- Give Windows user access rights
- Installing and starting as a service
- Adding SSL Certificate
- Domain user and Active Directory login
Give Windows user access rights
If you want to run ancoreShare Server as a different user (other than the administrator) or as a service, consider giving the Windows user the following two access permissions.
Read and write permission
Make sure the Windows user has full read and write permissions to the directory and all the sub-folders where ancoreShare Server is located.
HTTP / HTTPS rights
By running ancoreShare Server, the Windows user is starting a web service.
Therefore you need to enable this user to execute HTTP and HTTPS services:
- Open the cmd (Command Prompt) as administrator.
- Type whoami and press the Enter key to get your fully qualified username.
- Enter the following netsh command and replace your fully qualified username:
netsh http add urlacl url=http://*:41000/ user=yourfullyqualifiedusername - Repeat the command for HTTPS:
netsh http add urlacl url=https://*:41001/ user=yourfullyqualifiedusername
NOTE: The default ports are 41000 for HTTP and 41001 for HTTPS. You can change the ports in the npqReportServer.exe.config file.
Optionally, you can right-click the npqReportServer.exe file and select the Run as administrator, as the administrator usually has all the needed permissions and access rights.
However, if you want to run ancoreShare as a service you might need to provide those permissions to another Windows user.
See the next segment on how to set up the service.
Installing and starting as a service
Before you install the service you must enable the user to log in as a service:
- Sign in with administrator privileges to the computer from which you want to provide Log on as Service permission to accounts.
- Go to Administrative Tools, and click Local Security Policy.
- Expand Local Policy, and select the User Rights Assignment option.
- In the right pane, right-click Log on as a service and select the Properties option.
- On the Properties dialog box, add the user and save.
After that you can install the ancoreShare Server service:
- Right-click the npqReportService.exe* file and select the Run as administrator option to run it.
- Enter the Username as: "Domain\Username" or ".\Username"
- Enter your Password and click OK.
Important - QlikView only:
If you want to use QlikView as a source for your reports, the user must have a QlikView license installed.
To verify, perform the following steps.
- Find the QlikView executable file, typically located at C:\Program Files\QlikView\Qv.exe
- Right-click on the file while holding down Shift + Ctrl, and select the Run as Different User option.
- Insert the credentials of the Windows user dedicated to the ancoreShare Server service and check that QlikView Desktop is activated.
*(Although we re-branded the product name to ancoreShare, we chose to stay downwards compatible in respect of our long-time users, hence the installation will continue to run on "npqReportServer".)
Adding SSL Certificate
To use HTTPS, add the SSL certificate using the following steps.
- Open the cmd (Command Prompt) as administrator
- List your SSL certificates using the command:
netsh http show sslcert - Get certhash and appid from the chosen SSL
- Add the certificate to port 41001 (or your custom port if you changed the defaults in "npqReportServer.exe.config"), using the command:
netsh http add sslcert ipport=0.0.0.0:41001 certhash=xxxxx appid={xxxxx} - Alternatively, use PowerShell. Refer to Microsoft documentation - Add-NetIPHttpsCertBinding for details.
Domain user and Active Directory login
ancoreShare Server offers the unique feature to enable direct Active Directory Login for users, without importing or syncing the LDAP database.
If you want to make use of this functionality, you need to use a Domain User as the Windows user that runs ancoreShare Server.
System requirements
ancoreShare Server runs only on Windows. There are no special requirements for it.
- Server
- Visual C++ 2015 Runtime
- .NET Framework 4.6.1 or higher
- QlikView Desktop installed and licensed (only required when using QlikView Apps as a source, not necessary when only working with Qlik Sense)
- Client: Any ES6 compatible web browser. Click here to check compatibility.
- Domain user and Active Directory login
Next Steps
- Start Designing your reports