Intro
Data Export lets you create XLSX or CSV output from selected report elements.
For table elements, ancoreShare exports the underlying data. For text elements, ancoreShare can write text, formulas, labels, or comments directly into Excel cells. Other visual elements can be placed into XLSX workbooks as images where supported.
You can combine multiple elements in one Excel workbook, place them on the same or different worksheets, and control where each element starts in the sheet.
When choosing to export the table data to CSV, each element will be exported to a separate CSV file, but all the files will be generated at once (your browser might ask you to allow the download of multiple files).
Further you can choose file names, sheet names, and delimiters as you need.
Element based export
Data Export is enabled per report element. Global XLSX and CSV settings only provide defaults such as template, default filename, print settings, and default sizing.
Best Practice
Even if you are planning to create a PPTX report, we recommend keeping the export file type to PDF while you are designing to take advantage of all the benefits the preview window has. It will look exactly the same in PowerPoint when you later generate it as PPTX, aside from multi-page tables.
If you have enabled Data Export Downloads, we recommend keeping the export file type to Data Export only while you are designing to see only the data that you want to export quickly.
Use Case Video
Watch this video to see an inspiring example of how to combine powerful features like Data Export and Cycling through elements in your report:
🔑 Key Advantages:
📈 Simplified Excel Exports: Export data from your Qlik dashboards seamlessly into Excel or as CSV with just a few clicks.
💻 Cloud-Friendly: Perfectly compatible with Qlik Cloud and Qlik Sense environments, eliminating the need for external Excel processing.
🧮 Excel Formulas: Incorporate not only Qlik Expressions, but also Excel formulas directly in your reports for advanced calculations and data summaries, like adding totals to tables.
📝 Excel Templates: Upload and use Excel templates for exporting, ensuring consistency and saving time.
🔄 Cycling Sheets Feature: Generate multiple Excel sheets in a single export, each tailored to specific data or cycle values.
🎨 Cell Formatting Flexibility: Export not only the data but also formatting, original or adapted, for maintaining the visual appeal and clarity.
🔖 Table Range Naming: Simplify Excel analysis by setting range names for easy data referencing.
🎯 Custom Destination Cells: Define specific destination cells in Excel for each report element, ensuring precision and order.
Learn more about that in the following sections.
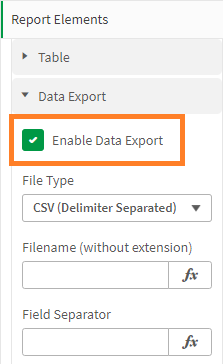
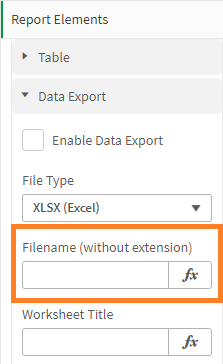
Enabling Data Export
Enable Data Export on every element that should write content to XLSX or CSV.
The most important settings are configured directly on the element: file type, filename, worksheet title, destination cell, relative position, and element-specific Excel options.
There are three related areas:
The following sections explain the specifics and relations of those settings.
Make sure to also read the Data Export section in Export Settings to further learn about centrally setting a filename for data exports or specify the delimiter of CSV exports.
Choose elementsEnable Data Export on each report element that should contribute to the generated XLSX or CSV output.
Repeat this for all elements that should be part of the export. |
|
File TypeYou can choose between Excel and CSV as an output format for your data exports. XLSX (Excel) is a rich format and allows to add multiple tables to a singe file, putting each element on a separate Excel sheet. Whereas CSV (Delimiter Separated) always creates a separate file for each table element, but all of them are generated at once (your browser might ask you to allow the download of multiple files). |
|
Filename (Element)By default all data export files are named after the Qlik Sense object ID of the respective table element. This also means that by default each table element is exported in a separate Excel or CSV file, named after its ID. Only set the custom name for the file here without the file extension (i.e. ".xlsx" or ".csv"), it will then be applied to both Excel and CSV exports. In order to put multiple table elements in a single Excel sheet, set the same filename for each. Table elements with the same filename property will be collectively exported in one Excel file. There is also the option to set a filename for the data export globally for the whole report in Export Settings. You can then choose to exclude certain table elements from this setting by giving a different filename here in its element properties. Pool tables in one file Table elements assigned to the same filename will be put in the same Excel file. |
|
Worksheet TitleThis setting only applies to Excel exports, as CSV files don't have sheets and only appears if the File Type is set to XLSX. Use this to control the worksheet where the element is written. Use Qlik Expressions for dynamic Worksheet titles or a Qlik Field if you cycle an element. Make sure your Worksheet title does not contain any forbidden characters and does not exceed the max. character limit of 30 (Excel default). |
|
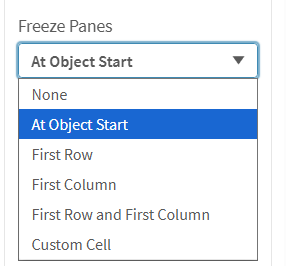
Freeze PanesFreeze Panes prepares the worksheet for users who open the export in Excel. Use it for large tables where headers or key columns should stay visible while scrolling. At Object Start is useful when the freeze position should follow the exported element. Use a row offset of 1 to freeze above the table body. Custom Cell gives full control. For example, A2 freezes the first row, B1 freezes the first column, and B2 freezes both. Multiple elements on one sheet If several elements export to the same worksheet, the last processed Freeze Panes setting defines the worksheet freeze behavior. |
|
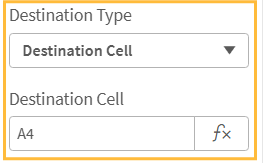
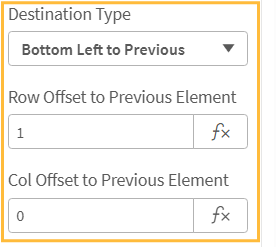
Destination Type - Element PositioningDestination Type controls where an element is placed in the worksheet. Use Destination Cell for fixed Excel layouts, especially when working with templates. Use relative placement when several elements should be arranged automatically. For example, place a text title first, then place a table below it, or place another element to the right of the previous one. Destination CellDefines the start cell for the element, for example A1, B5, or D12. Row and Column OffsetOffsets are used with relative placement. They add space between the previous element and the current one. |
|
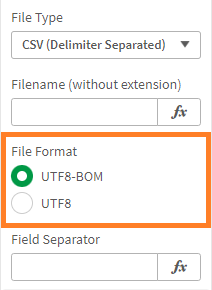
File FormatThis setting applies to CSV exports and only appears if the File Type is set to CSV. BOM (Byte Order Mark) is an invisible character used to indicate the encoding of a text file or stream. When a file is encoded in UTF-8 with BOM, the BOM character is placed at the beginning of the file to indicate that the file is encoded in UTF-8. This allows text editors and web browsers to correctly interpret the file as UTF-8, and display the characters correctly. This might for example be important if your CSV export is opened in Excel (which is also an editor), to make sure all potential symbols and characters are interpreted correctly. |
|
Field SeparatorThis setting applies to CSV exports and only appears if the File Type is set to CSV. You can choose and set a custom delimiter for your CSV data exports. It is a character which separates the columns in each data row. If you want to separate your data by a tabulator, just enter the word "tab" in this field. In cases where the set delimiter is also part of the field value in your data export, this data entry will automatically be put in quotes, for example: North Area, "10,000" (the delimiter is set to comma "," but is also part of the field value "10,000") There is also the option to set a CSV Field Separator globally for the whole report in Export Settings. You can then choose to exclude certain table elements from this global setting by setting a different delimiter here in its element properties. |
|
Data exports only | |
When choosing the Export Type PDF or PPTX, the data export is being generated additionally to that, but you can also choose to only export the data from all table elements of your report where this feature is enabled by choosing the option Data export only.
Learn more about how to export your report here. |
|
Enable Download | |
This feature is enabled by default and only refers to the download of the generated data export files in your browser. When user clicks on the ancoreShare button and If this feature is disabled, the data export is still getting generated (stored in your browser session cache) and can be exported otherwise, for example via custom JavaScript API.
Disable Data Export If you want to disable the data export completely, go to the settings of your Table Element, as this feature only refers to the download of the generated data export file. Filename (globally) |
|
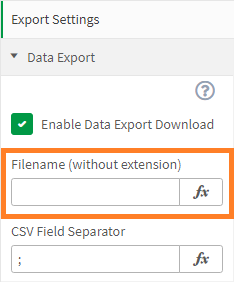
By default all data export files are named after the Qlik Sense object ID of the respective table element. This also means that by default each table element is exported in a separate Excel or CSV file, named after its ID. The filename you set here will be applied globally to this report and when choosing the export file type XLSX all table elements will be put in one Excel file. However, when the export type is set to CSV, each table element will create a separate CSV file regardless of the filename. Pool tables in one file If you want to put all table elements in a single Excel file, make sure no filename is set within element properties and choose the file type XLSX. Only set the custom name for the file here without the file extension (i.e. ".xlsx" or ".csv"), it will then be applied to both Excel and CSV exports. CSV Field Separator |
|
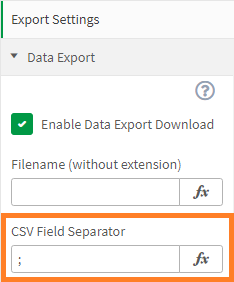
Set a global delimiter for CSV data exports (default is a semicolon ";"), it will then be applied to all table elements of this report, where the data export is enabled. The delimiter it is a character which separates the columns in each data row. If you want to separate your data by a tabulator, just enter the word "tab" in this field. In cases where the set delimiter is also part of the field value in your data export, this data entry will automatically be put in quotes, for example: North Area, "10,000" (the delimiter is set to comma "," but is also part of the field value "10,000") Global Setting If you want to have the same delimiter in all CSV exports within this report, make sure there is none set within each Table Element. |
|


.png)


Next Steps:
You can now download your report
or share it to Dropbox
or through a custom JavaScript API