Important
Access to this functionality requires a specific license or service level. Please check your current license or consult with ancoreSoft to ensure you have the necessary access.
Intro
In Qlik Cloud, you can create a shareable link via OAuth, user credentials, or Qlik JWT authentication to trigger ancoreShare report generation remotely. This link can be used for manual access or integrated with automation tools like Qlik Application Automation, Microsoft Power Automate, or with any other application like for example the Windows Scheduler, enabling scheduled or automated report execution.
Note
Two separate functionalities exist for automation purposes: one for triggering report generation (A) and another for sharing report files (B) after the report has been generated, whether through an automated or manual execution.
Automation: Triggering vs. Sharing
It's important to distinguish between these two functionalities in automations like Qlik Application Automation (QAA):
- Automate Triggering or Executing a Report: This option allows you to remotely initiate report generation to create new report files and is covered in this article. Because this process uses ancoreSoft Azure services, it requires a specific license or service level.
- Automate Sharing Generated Report Files: Once a report file has been created, whether through an automation or any other form of execution, a separate QAA flow can be set up to distribute or share the generated file(s). This sharing process does not require the same additional license or service level as the remote execution and is explained in a separate article here.
While these two functionalities can work together for full automation of report creation and distribution, they must be set up independently within automation flows, where different tools and options can also be combined.
With this distinction clarified, the next section explains how to create a shareable link for remotely triggering an ancoreShare report in Qlik Cloud, outlined step by step.
Access Link Window
To start creating a shareable link, click the button with the link symbol in the action bar. This opens the configuration window, where you can specify all settings for the link. |  |
Note The link generated at the end of this process contains all the settings configured during creation. If you need to adjust these settings later, you will need to generate a new link and update it wherever the previous link was used. 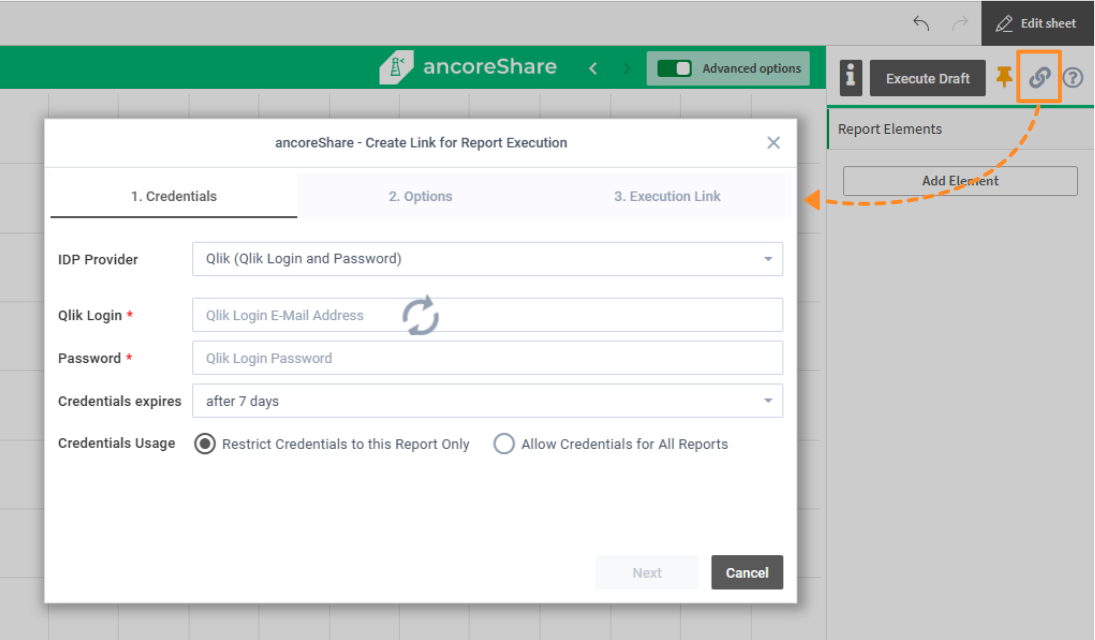
Step 1 - CredentialsThe Credentials tab is the first step in creating the shareable link. Here, you configure the authentication method and related settings to ensure secure access to the report. The following fields and options are available: - IDP Provider / Qlik Login / Password: Configure authentication by selecting the identity provider (IDP) and, if applicable, providing login credentials. For more information, see the related section below.
- Credentials Expires: Set the duration for which the credentials remain valid. Options include after 6 hours, after 1 day, after 7 days (default), after 1 month, after 1 year, and never. After the selected period, the generated link will no longer work, and a new link must be created to trigger the report remotely. This setting provides an additional layer of security, allowing you to control access based on your needs.
- Credentials Usage: Choose whether the execution token should be restricted to this specific ancoreShare report or can be used with any report in the Qlik environment.
Once all the fields are completed, click Next to proceed with Verification.
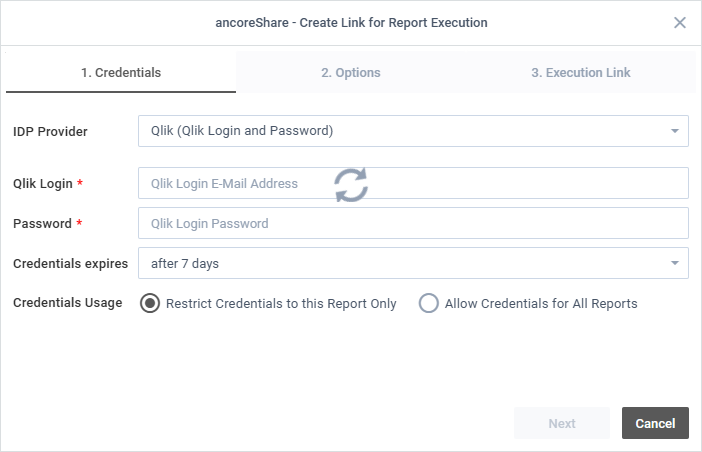
IDP ProviderThe IDP Provider field lets you configure the authentication method for the shareable link. There are currently two options, with a third (OAuth) coming soon: (A) Qlik Login and PasswordThis option uses a Qlik user’s email and password for authentication. Best Practice For better security and streamlined management, use a dedicated report user account instead of personal credentials. This approach ensures that report generation remains independent of individual users and supports consistent automated processes. |
(B) JWT (JSON Web Token)JWT is the preferred authentication method in environments where it is set up, offering greater security and convenience compared to using credentials with a password. Once JWT is configured in the environment, it becomes the default IDP Provider, simplifying the process for users. | 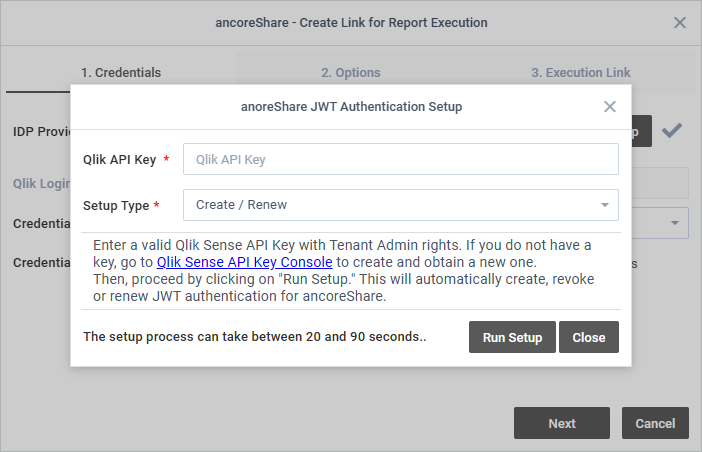 |
After the initial setup, the authentication details are applied automatically when creating a remote execution link, reducing user effort and ensuring a secure connection. While OAuth will provide an even more flexible option in the future, JWT remains an excellent choice for secure and efficient report execution. To configure or update the JWT setup: - Select JWT: Ensure JWT (JSON Web Token) is selected in the IDP Provider field. This will display the JWT Setup button in the interface.
- Open Setup Window: Click the JWT Setup button to open the setup window.
- Provide API Key: Enter a valid Qlik Sense API Key with Tenant Admin rights. If you don’t already have an API key, click the link in the setup window to access the Qlik Sense API Key Console within your Qlik Cloud environment, where you can create a new key or manage existing ones.
- Choose Setup Type: Select a setup type, such as "Create / Renew" or "Revoke" if applicable, and click Run Setup. The process typically takes 20–90 seconds.
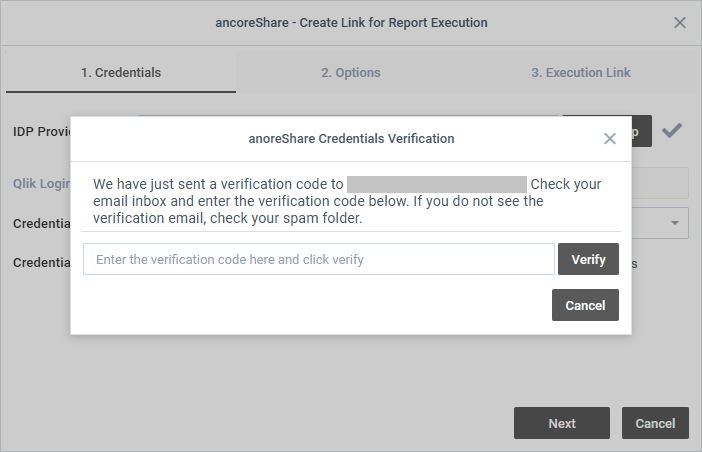
Once the setup is complete, a checkmark will appear next to the JWT Setup button, confirming successful configuration. The Qlik Loginfield will then be automatically populated with the current Qlik user’s email and cannot be edited.(C) OAuth (Coming Soon)An upcoming option will allow for more flexible and secure authentication through OAuth. Details will be added when this feature becomes available. VerificationOnce all the fields in the Credentials tab are completed, click Next to verify your credentials. Before moving to the next tab, a verification email is sent to the address specified in the Qlik Login field (a notification will appear in the top-right corner of the screen confirming that the verification email has been sent successfully). Simply check your inbox (and spam folder if necessary), enter the verification code in the pop-up window, and click Verify. Once the verification is successful, the system will automatically proceed to the next tab Options.
Step 2 - OptionsIn the Options tab, you can configure specific settings for how the report will be executed when the link is triggered. The following fields are available: - Report ID: Automatically populated with the Qlik Object ID of the current report. This ensures the link is tied to the correct ancoreShare button/report and cannot be changed.
- Bookmark (Optional): Select a bookmark to apply when executing the report. This pre-defines the state of the Qlik app (e.g., selections, variables, etc.) at the time of execution.
- Selections (Optional): See the Selections section below for details.
- Export Type: Choose the export format to be used for this report execution. The Report default is the export type specified in the report settings. Note that all formats starting with "PDF to..." require a specific license. For more information on formats and where to specify the export type, see the Export Formats article.
- Notification: Select the type of notification to be sent upon report execution. Options include No notification, Errors only, or Success and Errors. The email field is pre-populated with the current user's email but can be changed to any recipient address as needed.
- Webhook (Optional): Provide a URL to receive a callback once the report execution is completed. This allows integration with external systems for further processing.
Once all options are configured, click Next to proceed to the Execution Link tab. 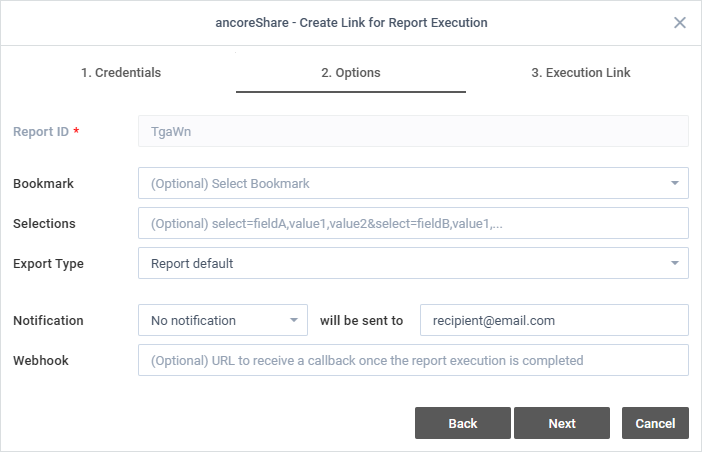 Selections Selections
The Selections field allows you to define specific Qlik field selections to apply when the report is executed. This can save time and provide flexibility in defining or modifying selections for the report. Best Practice Any selections made in the app at the time you start creating the link will be automatically pre-populated in the Selections field. This approach saves time, minimizes errors, and ensures accurate notation. It’s recommended to make your selections in the app before starting the link creation process. Editing Selections in the URLThe selections defined during the link creation process will be clearly visible in the generated URL. While this allows pro users to modify or update selections directly in the URL without recreating the link, caution is required to avoid mistakes in the string’s notation. This visibility also enables other programs, such as Qlik Application Automation (QAA), to dynamically replace or adjust the selection string for complex use cases, such as loops or conditional selections. Tip Selections can be dynamically configured in Qlik Application Automation (QAA). This enables advanced use cases such as creating loops, applying conditional selections, or generating multiple reports with varying criteria - all from the same base link. Selection NotationFor advanced users, the selection string follows a specific format: - Begin with select= for each field.
- Add the Qlik field name, followed by a comma, and then list the desired values from that field, separated by commas.
In the URL, a space is represented by "%20". When selections are made before starting the link creation process, all spaces will automatically be replaced with %20 in the string. In most contexts, such as the Selections field in the link creation window or the parameter box in Qlik Application Automation, it’s not necessary to replace spaces manually, as this conversion happens automatically during execution. However, if the URL is edited directly, it’s strongly recommended to replace spaces with %20 to ensure browsers interpret it correctly as a URL. Otherwise the browser might redirect to a search engine instead of calling the link. Here’s an example of a selection string: select=Product%20Sub%20Group%20Desc,Bagels,Eggs,Jelly&select=Region%20Name,Central,Western
This string applies the selection of "Bagels", "Eggs" and "Jelly" from the Qlik field "Product Sub Group Desc", as well as "Central" and "Western" from the "Region Name" field. Step 3 - Execution LinkIn the final step, the generated execution link is displayed based on the settings and options configured in the previous steps. This link is now ready to be used for triggering the report remotely. Make sure to copy it before closing the window. |
- Copy Link: Use the copy icon next to the link to copy it to your clipboard. This link can be used as-is in any program or platform capable of triggering the link, such as Qlik Application Automation (QAA), Microsoft Power Automate, or a scheduler.
- Edit Options: If you need to adjust settings from Step 2, you can go back, apply changes, and return to Step 3 to see an updated link. Note that changes to Step 1 require re-verification before proceeding further. Advanced users can also modify specific parameters directly in the URL to apply changes.
| 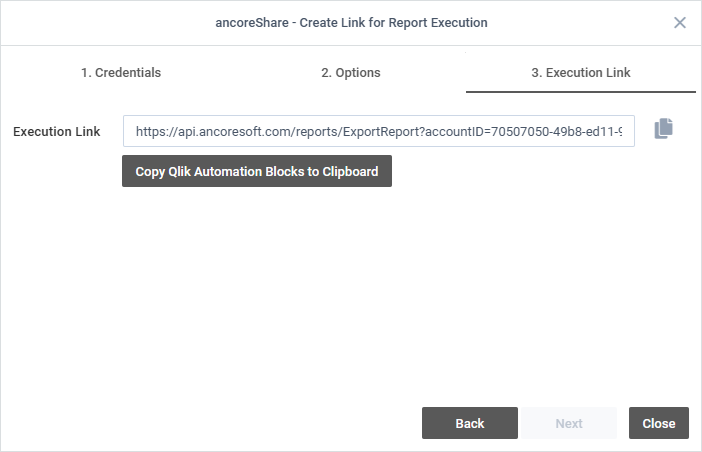 |
For QAA users, the Copy Qlik Automation Blocks to Clipboard button generates a preset of automation blocks to simplify integration. See the next section for detailed guidance on using this feature. Once the link is ready, you can close the window. Ensure you have copied the link or the QAA blocks first, as this section will no longer be accessible once the window is closed. If needed again, the process must be restarted from Step 1, including re-verification and all settings. |
Qlik Application AutomationNote This section focuses on automating the triggering and execution of reports. To automate the distribution of already generated report files, consult the relevant documentation. By integrating ancoreShare with QAA, you can create sophisticated workflows that automate report generation and distribution, enhancing efficiency and responsiveness in your reporting processes. | 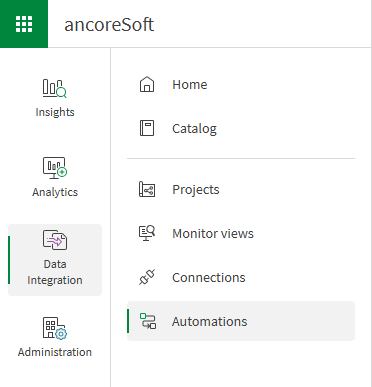 |
To integrate the generated ancoreShare report execution link into Qlik Application Automation (QAA) to remotely trigger your report, follow these steps:
- Copy the Prepared QAA Blocks: In Step 3 of the link creation window, click the Copy Qlik Automation Blocks to Clipboard button. This action copies a pre-configured automation block tailored for your report execution, including all preset parameters.
- Access Qlik Application Automation: Navigate to "Automations" in Qlik Cloud main menu either via "Analytics" or "Data Integration" (see image on the right). Here, you can create a new automation or open an existing one. If you don't see those options, your Qlik user might not have sufficient access rights.
- Paste the Copied Blocks: Within the automation editor, right-click on the canvas and select Paste block(s). The pre-configured block will appear on the canvas. Position it appropriately within your automation flow. (See image below for reference.)
- Configure Block Parameters: Select the newly added block to view their parameters in the properties panel. You can modify settings such as export type and selections or for dynamic scenarios, consider using variables or expressions for example to handle selections loops.
For comprehensive guidance on building and managing automations, refer to Qlik's official documentation: Qlik Application Automation

For even greater automation possibilities, you can combine this step with configuring automated deployment of the exported reports. This involves setting up a second automation in QAA dedicated to sharing or distributing the generated files. For detailed instructions, see the Qlik Automations article under the Sharing Reports section.
QAA Example: Looping Through Selection Values
This example demonstrates how to use Qlik Application Automation (QAA) to loop through selection values in a Qlik field and trigger an ancoreShare report for each value. In this case, the automation will loop through all sales representatives of the Qlik demo app Consumer Sales whose names begin with "A" and execute the report for each selection.
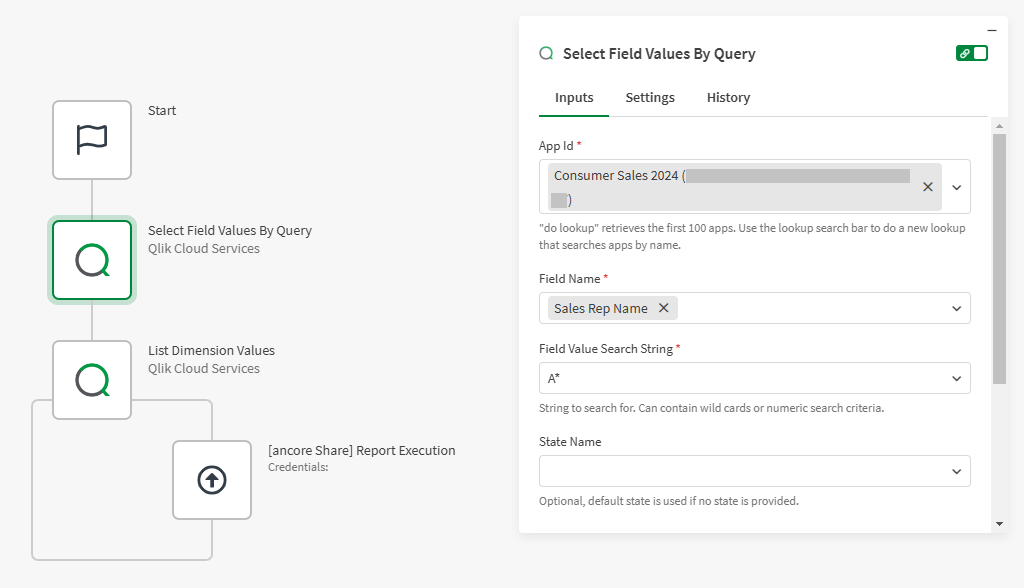
1. Select Field Values By Query - Add a "Select Field Values By Query" block to your QAA canvas after the "Start" block (or at the desired starting point in an existing automation).
- Configure the block as shown in the screenshot on the right:
- App ID: Add the ID of your Qlik App. You can copy this from the URL of the app in your browser. Use the "do lookup" feature in the QAA block to identify the correct app via ID.
Note Ensure that you select the Qlik app where your ancoreShare report is also located. - Field Name: Set the field you want to query. In this example, it’s "Sales Rep Name", which contains the names of all sales representatives.
- Field Value Search String: To limit results, enter A*, which retrieves only values starting with "A".
|  |
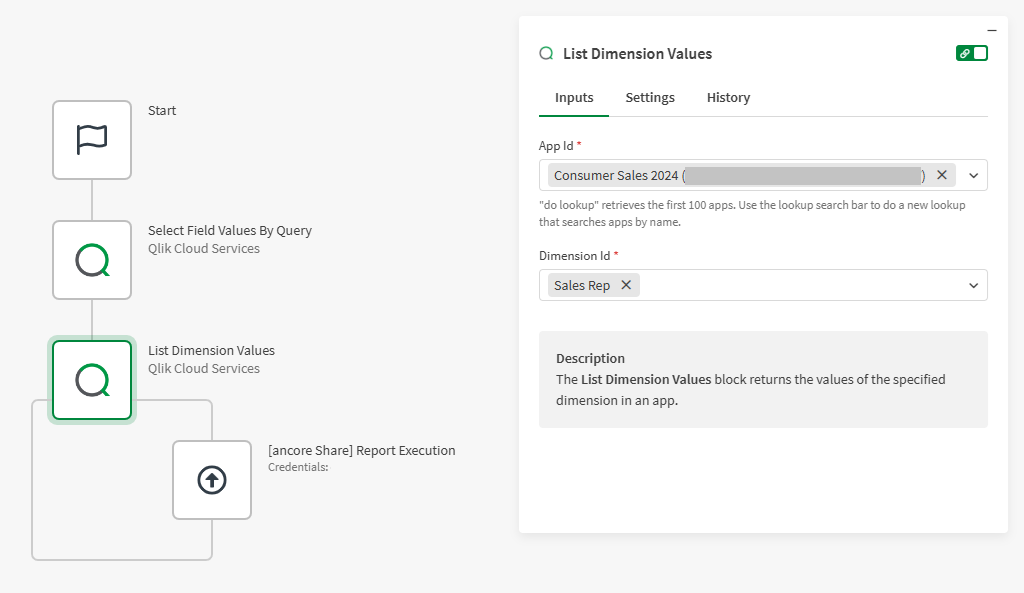
2. List Dimension Values - Drag and drop a "List Dimension Values" block to the canvas and connect it after the "Select Field Values By Query" block.
- Configure the block as shown in the screenshot on the right:
- App ID: Use the same App ID as in the previous block to ensure consistency with the data model.
- Dimension ID: Specify the dimension associated with the selection field, in this case, "Sales Rep".
|  |
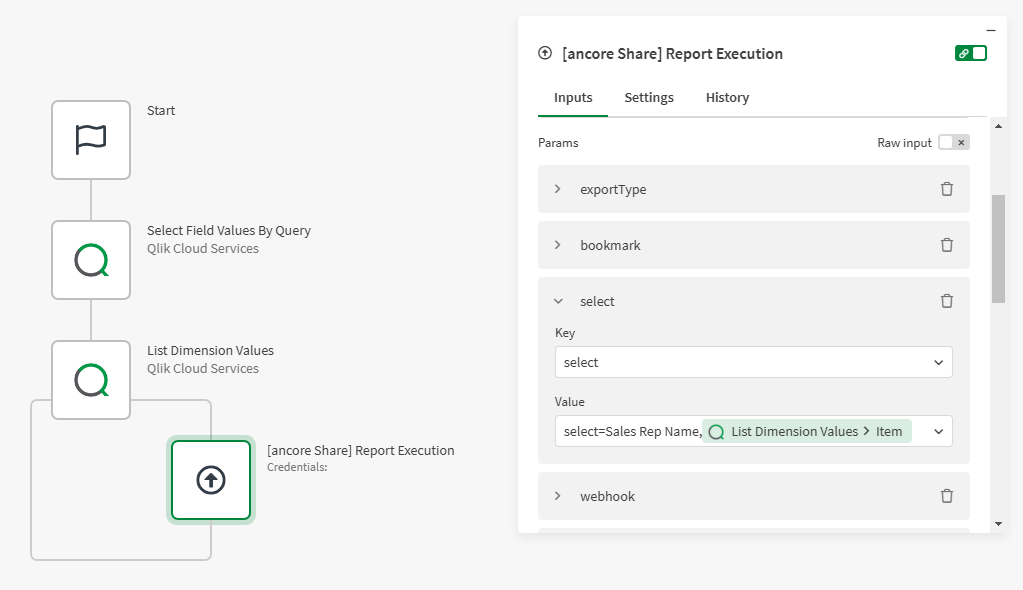
3. ancore Share Report Execution - Copy the ancoreShare Report Execution block from the third tab of the Create Link window in ancoreShare (as described further above).
- In QAA, right-click on the canvas and choose "Paste Block(s)" to add the copied block. Place it in the loop created by the "List Dimension Values" block.
- Configure the block as shown in the screenshot on the right:
- Parameter "select": Replace the values in the selection string with the variable "List Dimension Values > Item" from the previous block. This ensures that the selection dynamically updates for each value in the loop.
|  |
4. Running the Automation - Save the automation.
- Ensure that an export type is configured for your ancoreShare report, such as sending files to a Google Drive folder or Microsoft SharePoint. For details on these export options, see the article Sharing Reports.
- You can now perform a test run. This Qlik Application Automation will:
- Access the data model of your Qlik app.
- Loop through the selected values (Sales Representatives starting with "A").
- Execute the ancoreShare report for each selection.
- The generated report files will be delivered based on the configured export settings.
|
Note
This example focuses solely on generating reports. If you also want to automate the deployment of these reports, you can create a separate QAA for sharing and connect it to this process. For more details, see the article on
Sharing Reports.
Next Steps


