Intro
In striving for continual improvement, we periodically release newer versions of ancoreShare Server to incorporate new features and enhancements as they arrive. The following steps will smoothly guide you through the update process so you'll be back in business ASAP.
Review the steps below to update your ancoreShare Server environment and you'll be on your way.
Update Steps
- Download the latest version of the ancoreShare Server
- Stop ancoreShare Server either the service or session
- Create a backup at least of data folder and config file
- Update the Server by extracting the installation zip file (don't overwrite!)
- Replace backup content as needed
- Restart Server or Service
1. Download the latest version
If you're a direct customer, we'll always send you an update email whenever there's a newly released version. We're glad to see you back, and are happy to help with your installation process!
For indirect customers, our partnering company should have sent you a similar email announcing our latest update and assist you with the installation. Be sure to check your spam folder, or contact your representative in case you haven't received an update email.
New to ancoreShare Server? Get your free license here.
2. Stop ancoreShare Server
Before initiating any changes or installations on your computer, be sure you have the right credentials to run all updates as an administrator.
As with prior versions, ancoreShare Server can either be installed as a service or started manually each time you need it. With that information, choose the appropriate experience below.
A - When running as a Service
Stop ancoreShare Server when running as a Windows Service:
- Go to the Windows Services Management Console via the WinX menu.
- Select Run, and type services.msc and press the Enter key.
- On the Services window, search and right-click NPQ-Reports Server Service.
- Select Stop from the right-click menu.

B - When running manually
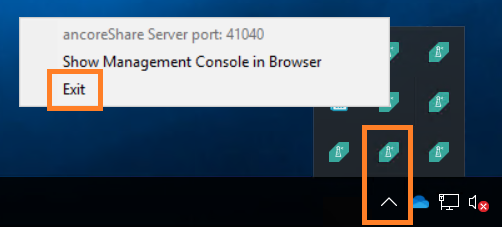
Like other manual programs that run in the background, ancoreShare Server always shows an icon in the taskbar system tray when it's in use.
Use the following steps to stop ancoreShare Server if you've started it manually:
- Right-click the ancoreShare Server icon in the taskbar tray as shown below.
- Select the Exit option from the right-click menu.

3. Create a Backup
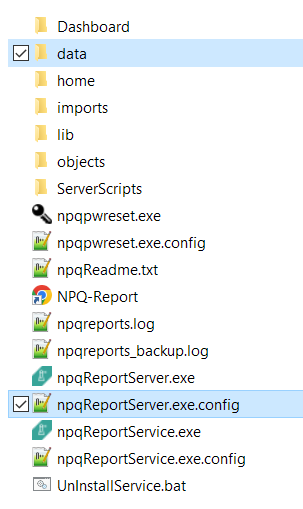
To ensure that no data is lost as you update, it's important to create a backup at least of your existing data folder as well as your "npqReportServer.exe.config" file before you proceed. In any way you will be advised in the next step to perform a "clean update" and not overwrite the existing installation directory, so it's best to just backup the complete parent folder.
- Best practice is to backup the complete directory, for example by renaming the current parent folder.
- Keep a copy of the file "npqReportServer.exe.config" handy.
- Make sure to be consistent with the name of your parent folder (default is "npqreports")
When creating a backup before updating, first navigate to your installation directory of ancoreShare Server via Windows Explorer. As you might have changed/customized the application Settings within the "npqReportServer.exe.config" file, make sure to also keep a copy handy - you might need it after extracting the update to restore customized ports and data path settings (see step 5). Info Although we re-branded the product name to ancoreShare, we chose to stay downwards compatible in respect of our long-time users, hence the installation name will continue to be "NPQReports". |  |
Your ancoreShare Server backup copy is in general just for safety during the update process and can be removed afterwards. However, we always recommend periodic backups anyway to ensure swift recovery in most situations.
ancoreShare Server database files are encrypted for the highest security and it might save you some hassle to have a backup somewhere else. Your ancoreShare Server installation directory contains all of the relevant database files (reports, users, sources, jobs, settings etc.) that you'll need to stow away for safe keeping. We always recommend periodic backups to ensure swift recovery in most situations.
4. Update ancoreShare Server
Once you have created your backups as outlined above, your update can finally commence! Basically this is just a matter of extracting the downloaded zip file.
We strongly advise to perform a "clean update" by extracting the whole zip file instead of overwriting the existing installation directory so no important files or file updates are left behind.
Therefore make sure to carefully follow step 3 above.
Next:
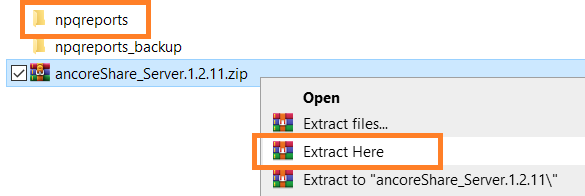
- Place the downloaded zip file where your renamed (backup) parent folder is as shown below.

- Right-click the zip file and select Extract Here. A fresh new installation directory of ancoreShare Server will be created with the default name "npqreports".

- Should you have customized the parent folder name before, make sure to rename the newly installed one to be consistent with any links or path references you might have created.
5. Replace backup content
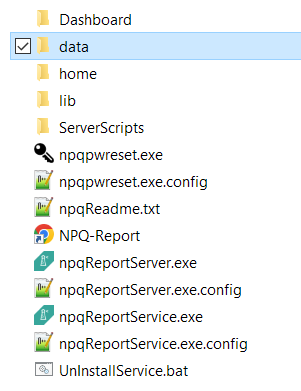
In any case copy the folder "data" from your backup folder (the renamed former installation directory) and paste it in the newly installed directory. This folder contains all of the relevant database files (reports, users, sources, jobs, settings etc.) that you'll need to stow away for safe keeping. If you changed the application settings for ancoreShare Server, you'll need to restore the correct ports for http and https access and optionally your customized database path in the file "npqReportServer.exe.config" as part of your update process. Important Do not replace the whole config file, as software updates might include important changes in this file. Only change the <applicationSettings> as described below. Instead of risking the overwrite of any important updates, you'll want to find the code block below within your configuration files. Select only these sections in your backup file and paste them in the corresponding areas to update these settings. |  |
  <applicationSettings>
    <npqReportServer.Properties.Settings>
      <setting name="databasepath" serializeAs="String">
        <value />
      </setting>
      <setting name="httpPort" serializeAs="String">
        <value>41000</value>
      </setting>
      <setting name="httpsPort" serializeAs="String">
        <value>41001</value>
      </setting>
    </npqReportServer.Properties.Settings>
  </applicationSettings>
6. Restart Server or Service
After a successful update, you can restart ancoreShare Server, either manually or restart your Windows Service.
Congratulations, you're all ready to check out the new & improved ancoreShare Server!
Update Worker Node
If you have installed Worker Nodes in addition to your Master Server, you can follow the exact same instructions for the Nodes as given for the ancoreShare Server in this article.
Tips and Troubleshooting
Basically installing and updating ancoreShare Server is very easy and mostly just a matter of extracting a zip file. However, even with simple things one can have small hiccups during the process. Below are some quick tips and tricks that we've gathered from helping so many others update:
- You do not need to restart your Windows computer or server.
- You do not need to stop the Master Server in order to update a Worker Node.
- Make sure your ancoreShare Server instance is not running.
- Make sure your Windows user has the required administrator credentials or permissions.
And make sure those credentials and permissions for starting ancoreShare Server have not changed. - Make sure the path to the installation directory has not changed.
Still having issues? Check the log file "npqreports.log" in the installation directory for further details.
And if you're still stuck, you can always reach out to us at support@ancoresoft.com for more information. We're happy to help!
Next Steps
- Start Designing your reports